Wednesday, May 14, 2014

I Smell Something Coming.


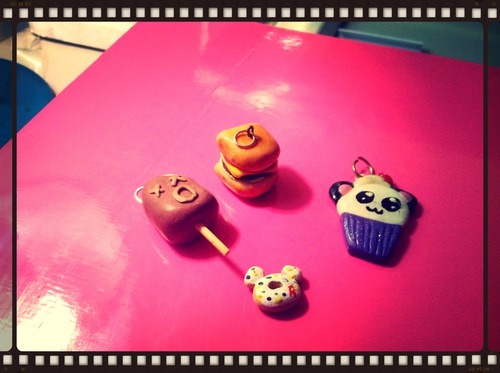
Right now I'm trying to take the extra step with my bakery collection, by introducing new scented charms with a delicious mix of scents. This project I'm working is really exciting for me because it gives me a chance to try and make new and classic designs for cupcakes and other desserts. If you haven't been able to tell, I love pastries and cakes. They just put a smile of my face, and that's what I hope to being to everyone with this new collection. 
It's a little bit challenging because I'm having trouble finding the right scents for some of the things I want to make. Specifically finding the right smell for strawberry, it seems that I either get something that not strawberry, smells too artificial or is just bad. Making me wonder what strawberry actually smells like, because when I do smell them, it's like I don't have a scent at all. If anything the scents that I tried smelled like what strawberries taste like to me, basically sour. I'll keep trying samples to see what would be a good match, I really don't want to give up on this.

What's your favorite dessert? Is there anything you would like to see me make?

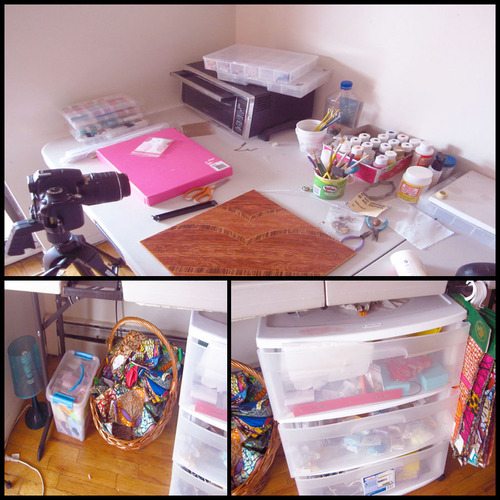
If you would like to see more of my journey and work in progress, check out my instagram page for updates. <3

Tuesday, March 25, 2014

Can You Color Polymer Clay With Kool-Aid?

Sometime ago an annon on Tumblr asked about coloring polymer clay with kool- aid, here was my thoughts about it:


"Hi, I am wondering if I can make DIY polymer with color in the clay? I thought about kool-aid as a dye but I don't know if it has been tried already. I like the idea of making my own clay but color is a big issue with me and I don't always want to paint. - Tammie"

Hi Tammie, I once considered making my own oven bake clay but it was to much trial and error for me to continue it so I give 2 thumbs up on going on that route.

I also haven’t heard of Kool-Aid being used for coloring but there are a few things I see that is problematic with the idea of using Kool-Aid:

  1. If your just putting the powder mix right in the clay then I’m assuming it works like mixing chalk pastels or makeup, you’ll keep adding more powder but you never get it to the exact color you want, sometimes you’ll even get unwanted clay chunks unless you intended it that way. (sometimes I do that because it adds a nice effect)

  2. Now if you’re mixing the powder with water first then this is where it can be tricky. Because the sugar from the powder will make the clay and your hands sticky/uneasy of work with. Maybe if you add so cornstarch to it, it might reduce the stickiness of the sugar. Be careful with how you mix the Kool-Aid, if it’s too pasty you’ll have little Kool-Aid chunks in your clay or if add you to much liquid it might not might not mix well. 
  • Keep in mind that because Kool-Aid has sugar init like I said before it makes things sticky also, it will attract bugs and flys. Unless of course you have it in a Ziploc back or air tight container 
I really think the best thing you could do if you want to color your clay inexpensively is use food coloring bought from your local grocery store.

I hope you don’t that I’m discouraging you from using Kool-Aid, I just think there might be better methods out there. By all means give it a try maybe it might work, heck maybe it might be even make your clay scented. Of flavored but who wants to eat clay mix.

Thanks for the question Tammie and let me know how it works out for you. <3

Saturday, December 28, 2013

Throwback Thursday?


image
Anyway a few months ago I was looking throw the cabinets in my kitchen and found this little leather print cosmetic bag, don’t ask way it was in the kitchen ‘cause I have no idea. Anyway what I found in it was actually some of the old charms I use to make when I used enter YouTube clay contest  or just for fun. It brought back some good memories of when I used to make random clay charms, and had all the time in the world :) Now I’m a college student and can barley understand sometimes how to manage, instead of taking a vacation, after New Years I’ll be taking winter class to try and speed my chances of graduation. Maybe in the summer I’ll take a brake….maybe.

image

  • I have a better picture of the Katy Perry creation on DeviantArt.
image

  • I think that everything but the Totoro was was for a contest. 
image

  • My attempt in making a guitar of a friend, I never liked how it turned out so I just never gave it to her.
image

  • The little Popsicle is the first charm I ever made.

Wednesday, October 23, 2013

Inspiration for Stary Night Bird Jewelry Set


Suggested by gasaii. Also inspired by the song “Skinny Love” by Bon Iver

Symbols:

The navy blue color/glitter: does it remind you of the stars? Well, the idea was to make it seem as if you where looking under the night sky and making a wish to the biggest star you see. Which was the 4 silver glitter pieces that look like an eye :)

The Roseof course represents love, it’s shaped like a stencil to look like a constellation.

The Tear: not necessarily meaning pain, but a mix of emotions both good and bad.

The Bell: is the beginning and end of love

The Bird: represents hope.


Tuesday, October 8, 2013

How Neat is Your Craft Area?

image

Ya’ll know that saying that crafters are never tidy, while I think that applies to the picture. I use to move room to room and corner to corner around my house because I never had  enough space. It wasn’t until I got this table that I was able to find "the craft area" with enough space for me to get by. Although I’m not sure how I’m going to get bye when I officially start using a sewing machine :/

♥♥♥♥ Thanks for reading, please leave a comment on the blog or if you have questions ask ♥♥♥♥

Monday, October 7, 2013

How I Make Flocking Powder

image


I always remember seeing this at Micheal’s but never knowing what I would do with it if I bought it. It wasn’t until I saw a tutorial on YouTube where it was used to make a fuzzy animal charm, that I saw the use for it. While it isn’t expensive to buy especially if you have coupons, an idea came to me on making my own, since all the craft stores I go to are a far away. Okay, so lets start.

What you need:

  • Scissors

  • Container or zip lock bag

  • Chenille Stems (Craft Pipe Cleaners)
Step 1: Cut the the edges of the furry part of the pipe cleaner

image

image

Step 2: It can get messy so place it into your bag or container after your done cutting the first stem

image

Step 3: Repeat until you get the amount you want.

Step 4: Is to have fun with it, you can use it for your nails, special occasion cards and even polymer clay or anything you can think of.

Note: There are easier methods of doing this like using yarn, stain fabric or ribbon  but I had the pipe cleaners sitting in my room for a year and decided it was time to do something with it.

♥♥♥♥ Thanks for reading, please leave a comment on the blog or if you have questions ask ♥♥♥♥